User Help System
Entering or Importing Allocations
Users can enter single allocation details directly in the Allocation screen or import account and quantity details from a CME Group template that is available for download on the EFS application homepage. The following allocation modes are available:
Single Allocation Mode
Use Single Allocation Mode to search and allocate non-trade activity for a specific product exchange and a single commodity / product. In addition to entering single allocations directly, users can also download a template to enter then import allocations.
- To manually enter single allocations:
- From the EFS main menu, click Allocations.
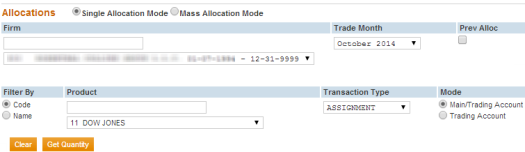
- From the Allocations page select Single Allocation Mode.
- Specify the Allocation Criteria:
- Firm
- Trade Month
Note: If allocating previously allocated trades, select the checkbox and specify the Process Month. Use the Trading Account (number) to which the transactions were previously allocated. Refer to: Editing Previously Allocated Trades.
- Product
Entering the first few characters filters available product selections.
- Code - Enter the alphanumeric product code, then select from the available choices.
- Name - Enter the Product Name, then select from the available choices.
- Transaction Type
- Mode
- Main/Trading Account - Specify the Main Account, a Trading Account is not required.
To ensure users do not enter an incorrect account number, this feature provides only accounts that have been registered in the Account Maintenance section.
- Trading Account - Specify the Trading Account.
This mode enables a user to input the respective trading account without restricting users to what has been registered within the EFS. This feature may also be utilized for allocating transactions to non-member accounts.
- Click Get Quantity.
Executes the search feature for the specified criteria. Each mode will display the following on the upper area of the allocation page. These numbers cannot be edited.
- Current Transactions - Unallocated transaction count.
- Current Quantity - Number of available contracts to be allocated.
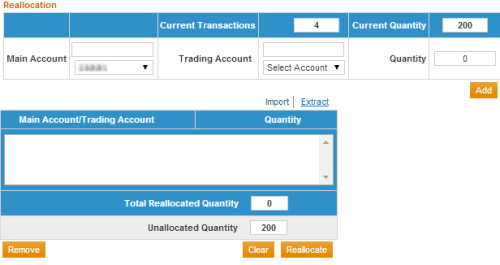
- On the Reallocation pane specify the Main and / or Trading Account and Quantity to allocate, then click Add.
To allocate transactions to additional Main and / or Trading Accounts, repeat step 5.
Users can continue to allocate as long as the Unallocated Quantity is greater than zero.
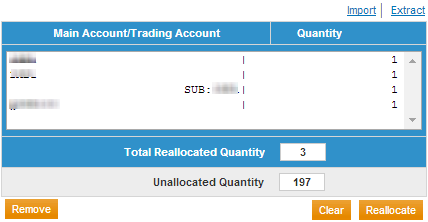
The specified account and quantity appears in the reallocation pane. Review the accounts and quantities to verify is correct.
- To complete the allocation(s), click Reallocate.
For EFS to process allocations, users must click Reallocate.
- To Remove an Account (Prior to completing the Allocation):
- Within the Reallocation pane, highlight the line(s) to be removed.
- Click Remove.
A confirmation message appears.
- To confirm, click OK or Cancel to exit.
Upon clicking OK, a confirmation message appears and the unallocated transaction count is updated.
- Click Reallocate.
A confirmation message appears.
- To finalize the submission, click OK or Cancel to exit.
Upon clicking OK a confirmation message appears with a confirmation of the allocated quantity.
Note: After allocations have been submitted, they Cannot be changed during the same business day. The system processes allocations overnight and transactions are not available to edit the following day.
| Reallocation Pane - Options | Description |
|---|---|
|
Adds the specified criteria to the reallocation pane. |
|
|
Refer to Single Allocation Import instructions. |
|
|
Saves the reallocation details and queue as a pipe delimited text (flat) file. |
|
|
Removes the selected transaction from the reallocation pane. |
|
|
Clear all selections. |
|
|
Reallocates the specified reallocation pane. |
Single Allocation Import
Single Allocation Import is available after performing a search.
- To perform a single allocation:
- From the EFS Homepage download the Allocation Import Template - Single.
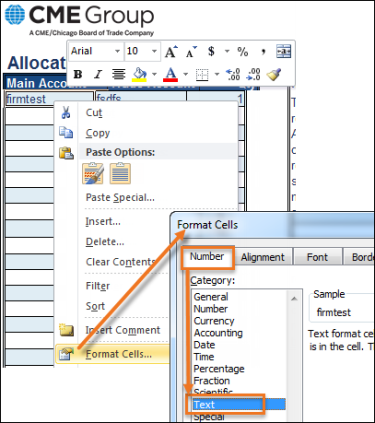
- Format single allocation columns, as text.
Note: Select column > right-click > select Format Cells > Select Number tab > Select Text.
- On the Single allocation spreadsheet, enter allocation details.
Account number and quantity entry follows the same rules as Single Allocation entry via the screen.
- Main Account - If the User has selected Main/Trading Account, Main account is required when populating the spreadsheet.
Note: Trading account is not required.
- Trading Account - If the User has selected mode Trading Account, Trading Account is required when populating the spreadsheet.
Note: Main Account must NOT be entered or validation will fail.
- Quantity (Qty) - The required field that indicates the total non-trade activity that should be allocated for the specified Trade Month, Commodity Code, Trading Account.
Upon finalizing the allocation, a confirmation message indicates an unallocated quantity of non-trade activity exists.
- Execute the search based on the Trade Month, Commodity, Transaction Type and Mode, then click Get Quantity.
The Import feature appears above the Reallocation pane.
- Click Import (above the Reallocation pane), Navigate, then Select the completed Single Allocation spreadsheet.
The system performs a validation and imports allocation data in the reallocation pane. If validation is not successful a message indicates the likely error. Review pending allocation(s) to ensure it matches the spreadsheet.
Users can Add additional allocations, Remove, Clear or Extract displayed criteria. The Import function affects only the data within the Reallocation pane.
- To finalize, click Reallocate.
For EFS to process allocations, users must click Reallocate.
Imported allocations impacts only the population of the data derived from the search.
Mass Allocation
Use the Mass Allocation mode to upload allocation details for non-trade activity for a specific product exchange and multiple commodities / products / allocation types (Exercise, Assignment, etc.) within a single upload. Mass allocation is performed by file upload only.
Prior to entering allocation details, use Reports or Transaction Viewer to determine the available quantity to allocate.
- To perform a mass allocation:
- From the EFS Homepage download the Allocation Import Template - Mass.
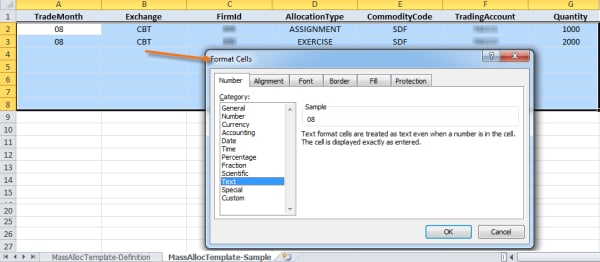
The template is comprised of two tabs:
- Definition - For the required fields, descriptions, maximum field lengths and examples of valid values are listed. This tab is for informational purposes and not included with the uploaded file.
- Sample - Serves as a sample of an completed allocation worksheet.
- Format cells, in Excel, as text (Select cells > Right-click > Number tab > Select Text).

- On the Mass allocation import spreadsheet enter allocation details.
- Click File > Save As, select .csv (comma delimited) format then close the file.
A dialog appears, to confirm whether to save the active sheet (OK) or choose a format that enables multiple sheets (Cancel).
- Select OK.
A dialog appears, to confirm whether to save the workbook in CSV (comma delimited format). Incompatible features (visual and aesthetic formatting) will be lost.
- From the EFS main menu, click Allocations.
- From the Allocations page select Mass Allocation Mode.
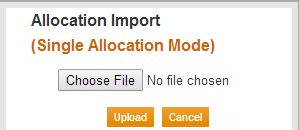
On-screen instructions and a file upload field appears.
- Click Choose File, Navigate, then Select the completed Mass Allocation spreadsheet that contains the non-trade activity.
- Click Verify File.
A validation is performed.
- Success - The system performs a validation and a confirmation message appears.
- Error / Warning - If the validation fails, and error or warning message appears with description of corrective measures and fields that failed validation.

Note: All error messages require resolution prior to a new file upload.
- To finalize, click Reallocate.
For EFS to process allocations, users must click Reallocate.
A warning message appears if you attempt to allocate less than the total non-trade quantity. The remaining quantity can be allocated in a subsequent upload.
Note: To verify non-trade allocation activity, for this and other uploads, review the Current Day Allocation report.


