User Help System
Sandbox-Dallas Setup
The following instructions describe the process for firm administrators at registered entities to use Request Center (ESS) self-service functions to request access to CME Globex on Google Cloud - Sandbox-Dallas environment for CME Globex on Google Cloud. This includes submitting Google customer configuration information, creating and updating NCC Peering requests, followed by entity setup, which includes creating a Globex Firm ID, iLink Session ID and Drop Copy Sessions.
- For an overview of the available services, processes and required activities (including Google Customer Information and NCC Peering) see the Sandbox-Dallas Setup Overview.
- For an overview of the Sandbox-Dallas, refer to CME Globex on Google Cloud - Sandbox Environments.
Contents
- Customer Agreements and Setup
- Google Customer Information
- Network Connectivity Center (NCC) Peering - Create new or update pending network connection requests
- Setup CME Globex Applications and Services
- Globex Firm ID (GFID)
- iLink order entry
- Drop Copy Group
- Securing Order Entry / Drop Copy
- Connect to Market Data Platform 3.0 (MDP 3.0)
- Establish Network Connectivity
- Connection and Testing
Customer Agreements and Setup
Ensure the following is available, or contact Global Account Management to request onboarding assistance.
- Create new or use existing CME Group Login with multi-factor authentication
- Submit Customer Agreements:
- Google Cloud Master Service Agreement
- Customer Connection Agreement
- CME Customer Center self service agreement
- Legal Entity Identifier
- Obtain the Front Office Administrator User Entitlement for the Dallas Sandbox
Google Customer Information
The customer (Admin Manager acting on their behalf) must define their cloud infrastructure details. This registration occurs after confirming required customer agreements and prior to NCC Peering.
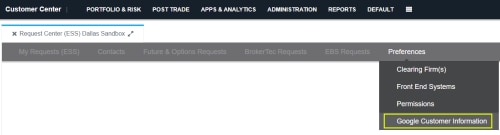
- From the CME Customer Center - Administration menu, select Request Center (ESS) Dallas Sandbox.

- From the Request Center (ESS) menu that appears, select Preferences, then select Google Customer Information.
- Select an Administration Group (Registered Entity) to manage.
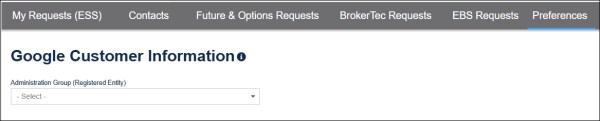
If you have access to just one entity, it is selected by default.
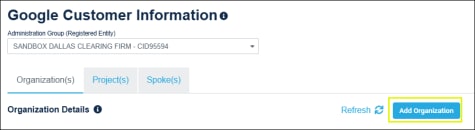
- Google Organization Name (Domain): The domain name provided by Google (up to 60 characters) on the Google Master Agreement.
- Google Organization ID: Enter the unique 1-to-12 digit numeric ID assigned by Google (cannot be zero).
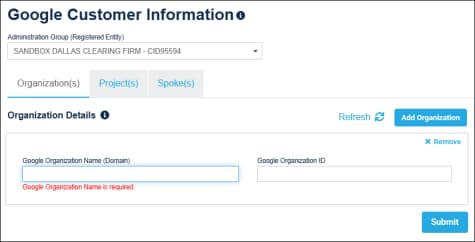
Additional functions (Add, Delete, Refresh)
- Add an additional organization ( ), associated with the selected entity.
- Delete ( ) then confirm organization deletion on the dialog
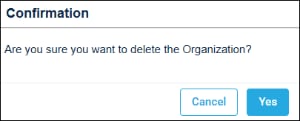 .
.
- Update the list to include recently added organizations ( ).
).
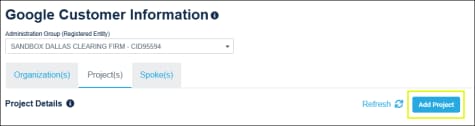
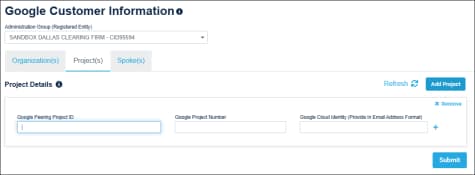
- Google Peering Project ID: An alphanumeric user specified identifier, that must be unique across environments.
- Google Project Number: The numeric-only identifier generated by Google Cloud.
- Google Cloud Identity: Enter the email address of the user that will submit the NCC Peering request and manage the NCC peering connectivity and GLink network connection.
Note: This MUST be the same individual that will submit the NCC peering command.
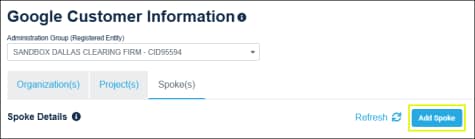
- Spoke Name: A user-defined name 6-30 characters; lowercase letters, numbers, and hyphens only; must start with a letter and cannot end with a hyphen.
To manage connections and assist troubleshooting, CME Group recommends each Network Interface Controller (NIC) have a unique spoke name at the organization.
- Package Type: Select either
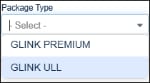 :
: - GLink ULL (U4C - also referred to as bare metal) - at least one, maximum of three
- GLink Premium (U4S - also referred to as virtual machine)) - specify at least one
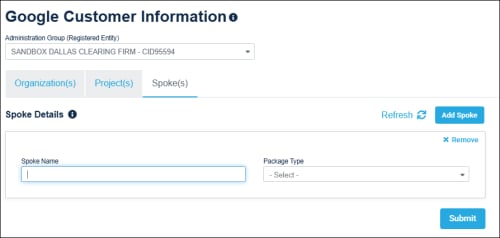
Note: If package type is changed during this process, entered spoke details will be lost.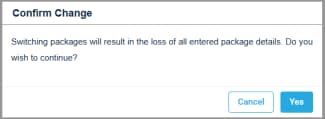
- To finalized entered organization, project, spoke details, select Submit.
Note: If submitted information requires update or correction, contact Global Account Management for assistance.
NCC Peering
To ensure performance, security, and physical isolation of the Dallas Sandbox environment, CME Group’s ultra-low latency infrastructure resides within private Ultra Low Latency zones of the Google Cloud Dallas Region.
Submitting a NCC Peering request, enables coordination between CME Group and Google Cloud Operations to authorize the specified Google Organization ID and Project ID to access the Ultra-Low Latency (ULL) private zones, via project-level allowlisting.
After completing setup, client system connectivity can be established and testing performed.
- To submit a NCC Peering request:
- (if applicable) From the CME Customer Center - Administration menu, select Request Center (ESS) Dallas Sandbox.

- From the Request Center (ESS) screen that appears, select Futures and Options Requests, then select NCC Peering.
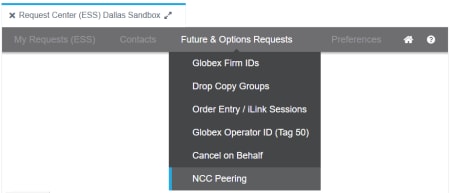
- Select the Administration Group (Registered Entity) to manage (selected automatically for users with access to one AG), then, from the screen that appears, select Create NCC Peering Request.
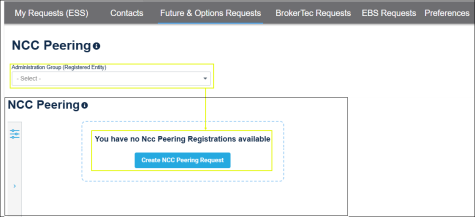
Note: To update a pending request or add a connection package, see Update instructions.
Filter ( ) available NCC Peering connections by entering (full / partial) information that describes the connection.
For field descriptions, refer to Google Customer Information and NCC Peering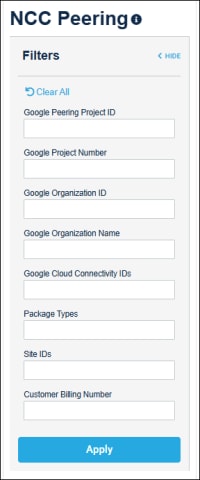
- Enter the following Customer Details.
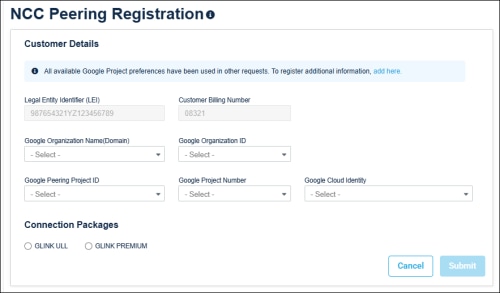
- Legal Entity Identifier (LEI): A 20-character pre-registered LEI (automatically entered) based on the selected Administration Group (Registered Entity).
- Customer Billing Number: A 5-character alphanumeric billing identifier associated with the selected Administration Group (Registered Entity).
- This following (Organization, Project, Scope) information must match Google Customer Information - Project Information.
- Google Organization Name (Domain): The domain name provided by Google (up to 60 characters) on the Google Master Agreement.
- Google Organization ID: Enter the unique 1-to-12 digit numeric ID assigned by Google (cannot be zero).
- Google Peering Project ID: An alphanumeric user specified identifier, that must be unique across environments.
Note: Only one GLink / NCC Peering request is permitted per project ID. Customers are advised to plan resources accordingly and ensure a specific, authorized individual Google Cloud Identity (GCI) email address is used for the request (instead of a group / general support alias).
- Google Project Number: The numeric-only identifier generated by Google Cloud.
- Google Cloud Identity: The selected email address, for the cloud identity. This MUST be the same individual as the Google Customer Information request.
Connection Package: Select GLink ULL or GLink Premium, then specify the Spoke Names, created during Google Customer Information setup.
- GLink ULL (U4C): Up to two ULL zones and two premium zones per request
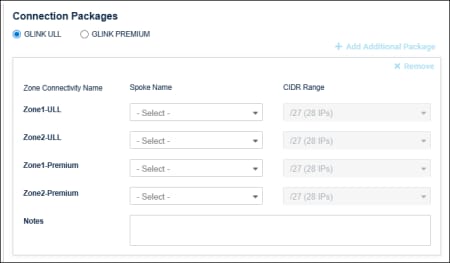
- GLink Premium (U4S):Up to two premium zones per request
If GLink Premium is selected, and customer information is not available the following message will appear: "No spokes configuration found for the selected package type." To setup required information, see Google Customer Information.
Note: If the connection package is changed during this process, entered details will be lost.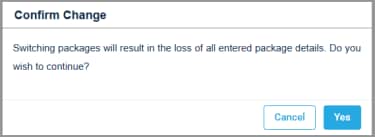
- To finalize entry, select Submit.
After submitting the secure registration, the request is assigned an in-progress status. After processing and CIDR ranges are added by CME Group, an activation email will be sent with the assigned connection information (/27 CIDR, VPC).
Following the NCC Peering submission, CME Group will initiate the allowlist client approval, notify Google to grant Project ID access to Sandbox-Dallas private regions and send Required network information* to the client to create VPC connections.
*Network Information: For the selected Zone and Spoke selection, a block of reserved IP addresses will be reserved for connection and network operations.
For example: /27 - out of 32 total IP addresses available, 28-29 are available for secure client system/virtual private cloud (VPC) connections.
The assigned CIDR range (one range per instance) can be used for a single server or distributed (e.g. A/B subnet) to support scaling, load balancing, redundancy.
Update NCC Peering
The following instructions detail the process for updating a pending NCC Peering request that has not completed processing. For example, changing the Connection package to another type (Premium to ULL / ULL to Premium) or adding an additional type to enable comparative testing between the two connection packages or a request to change a pending submission that is no longer needed.
For testing, up to three total connections packages are permitted, two ULL and one premium.
- To update a pending NCC Peering request:
- (if applicable) From the CME Customer Center - Administration menu, select Request Center (ESS) Dallas Sandbox.
- From the Request Center (ESS) screen that appears, select Futures and Options Requests, then select NCC Peering.
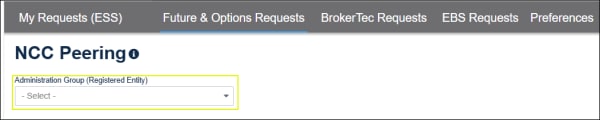
- Select the Administration Group (Registered Entity) to manage (selected automatically for users with access to one AG).
- From the screen that appears, select + (Add additional package).
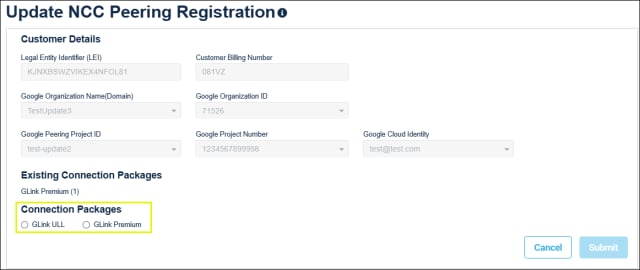
The Update NCC Peering Registration page appears with view-only Customer Details.
In this example, a customer with an existing GLink Premium package, can add an additional GLink ULL or GLink Premium package.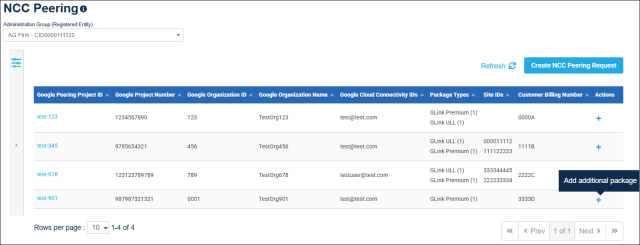
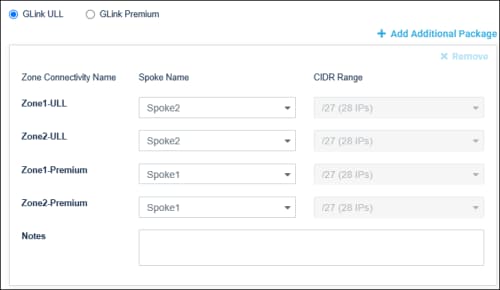
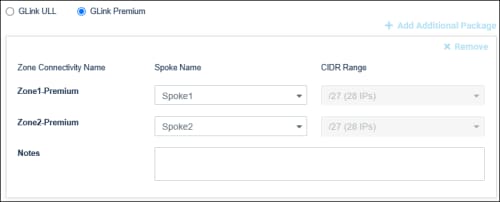
- Select GLink ULL (U4C) or GLink Premium (U4S), then specify the Spoke Names for the requested connectivity zones that were created during Google Customer Information setup.
- GLink ULL
- GLink Premium
Upon submitting the request has an In-progress status.
After review and validation, CME Group adds the CIDR range and the status updates to Completed. An email confirmation will indicate completion and include the assigned CIDR ranges.
Setup CME Globex Applications and Services
To begin API testing, you must set up CME Globex Applications and Services entity information. Use the below instructions to create a Globex Firm ID, iLink Order Entry, Market Data (MDP 3.0) connection, and Drop Copy group.
Prior to performing the below process, ensure entity information has been confirmed via an email (After Google Customer Information and NCC Peering completion).
Globex Firm ID
Create a Globex Firm ID (GFID) to identify the market participant entity that will submit test trades.
- To create a Globex Firm ID (GFID) for the Sandbox-Dallas entity:
- From the Futures & Options Requests menu, select, Globex firm IDs.
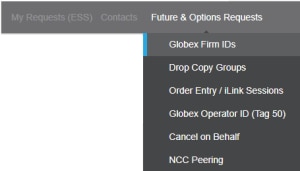
- From the Futures & Options Requests - Globex Firm ID page, select Create Globex Firm ID.
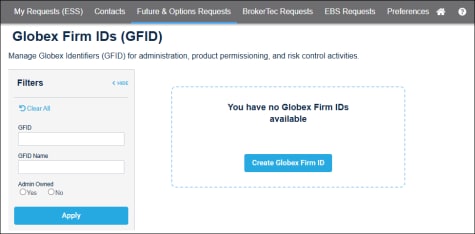
Note: Required fields are indicated by an asterisk (*).
- Effective Date (default: today's date): Upon admin approval, GFIDs are available on the specified date.
- Administration Group (Registered Entity): The new GFID will be associated with this entity. This is automatically selected based on the user's profile.
- Firm Name: Enter a unique (at the Registered Entity level) executing/trading firm name.
- Clearing Firm Mapping: For the designated Clearing Exchanges, select at least one Clearing Member to associate with the executing/trading firm.
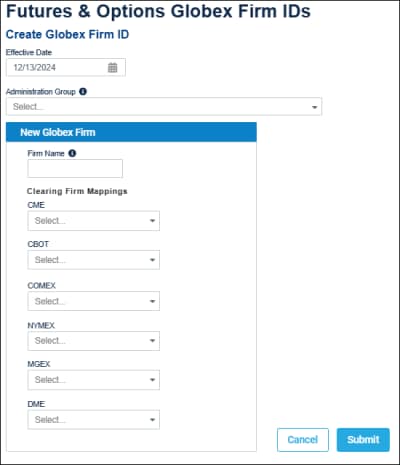
Note: To update / add available clearing firm selections, select Request Center (ESS) > Preferences > ClearingFirms > 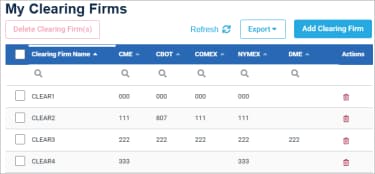
- To complete the request, select Submit.
A notification banner appears and email notification is sent to the requestor and clearing firm admin manager.
iLink Order Entry session
Create an iLink order entry session to test session and order management messaging.
- To create an iLink order entry session for the Sandbox-Dallas entity:
- From the Futures & Options Requests menu, select, Order Entry / iLink Sessions.
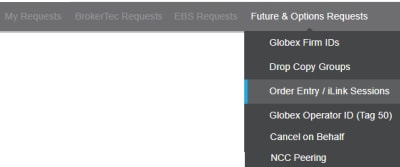
- On the Order Entry / Link Sessions page select, select Create iLink Session(
 ).
).
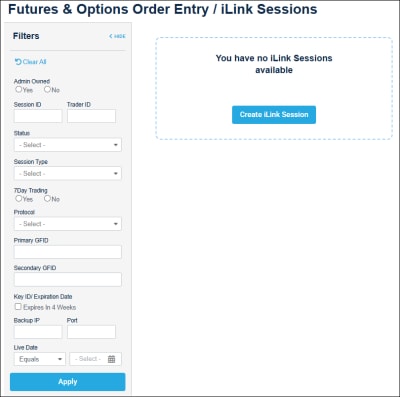
- On the screen that appears, enter session details.

- Administration Group (Registered Entity): Determines available Globex Firms
- Primary Globex Firm/Secondary Globex Firm
If CGW is selected, review 7 Day Trading (below).
- 7Day Trading: Applicable for CGW type only - Select if the iLink session will be used for 7 day trading.
- Session Protocol: (default) Binary (FIXP)
- Number of Sessions: The number of available sessions cannot be more than allocated to an entity (Globex Firm). iLink session creation may incur a fee.
Upon submitting, a fee acknowledgment indicates the amount per session and total.
- Front End System: Applications for which the iLink session is authorized.
Note: To manage available system selections, see Request Center (ESS) - Front End System.
- Requested Live Date
- Business Rationale / Background
- Upon completion of required data, click Proceed.
An acknowledgment message appears, indicating Port Activation Charges (PAC), if applicable, for the requested session.
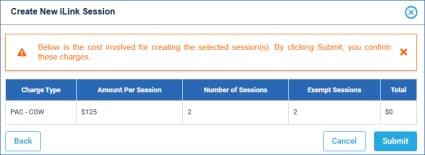
- If you agree with the setup details and fee, click Submit.
Drop Copy Group
Create a Drop Copy Group to test execution report / acknowledgment messages.
- To create a Drop Copy group for the Sandbox-Dallas entity:
- From the Futures & Options Requests menu, select, Drop Copy Groups.
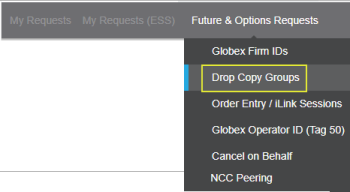
- If you have access to more than one AG / Registered Entity, select from the Registered Entity / AG / menu.
- Select Create New Group.
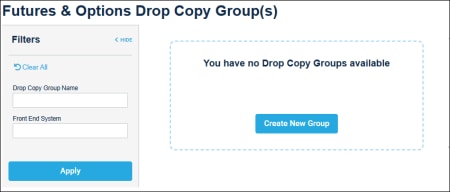
(if applicable) A dialog indicates the number of existing Drop Copy groups and the fee for creating a new group.
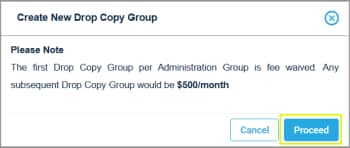
Note: Customers receive one free Drop Copy Group, a fee is incurred for each additional instance.
A single Drop Copy Convenience Gateway (CGW) target can have up to 1000 CGW sendercomps.
A single Drop Copy Market Segment (MSGW) target can have up to 5000 MSGW sendercomps.
- To continue, select Proceed.
- On the page that appears specify the Drop Copy Group Name and Front End System to monitor.

Available communication types:
- Acknowledgment (Ack) Messages.
- Execution Reports - includes:
- Execution - Order Entry: New Order Acknowledgment message.
- Execution - Create / Cancel / Modify: Response message.
- Execution - Elimination: Order expiration message.
- Trade - Fill Notice: Complete and partial fills.
- Trade - Trade Cancel: Notifies user of trade cancellation.
- Heartbeats: The response message that confirms connectivity.
- Order Mass Action Filter: Confirms the number of canceled orders.
- Trade Busts: Trade cancellation: (see Trade Cancel, above).
Note: Using session configuration information provided, selected communications are routed to the Source SenderComp / Session IDs.
Select from the available Source SenderComps- click Add.
Note: A column indicates Source SenderComps available for seven day trading; based on the configuration of the iLink Order Entry session.
Securing Sandbox-Dallas Order Entry / Drop Copy
The Request Center (ESS) includes function to manage Hash Message Authentication Codes (HMAC) for secure to iLink Order Entry and Drop Copy sessions. Authorized users can generate private security keys or manage secure iLink Session activity.
- Client identity verification: Login is signed and validated using security credentials.
- Message confidentiality and integrity: CME Globex uses customer submitted credentials to calculate the HMAC value to validate against an order entry or drop copy login request.
User generated key pairs:
- Access Key ID - Secure login request + Secret Key - Used to create HMAC signature to secure login and order entry message activity.
- To secure the iLink order entry session with HMAC authentication:
- From the Futures & Options Order Entry / iLink Sessions page,select the checkbox for the session to manage, then select Actions > Generate.
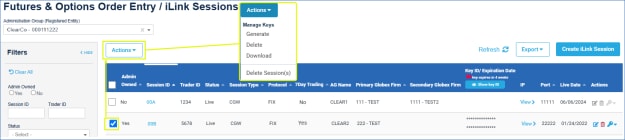
The selected session ID appears in a dialog, including existing key details.
- To continue, select Submit.
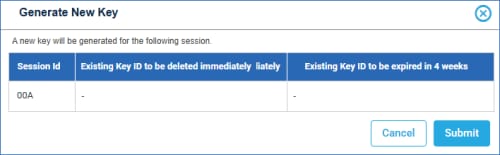
The dialog updates to include Key details.
- Select Download to proceed to a verification prompt; required before accessing private key details.
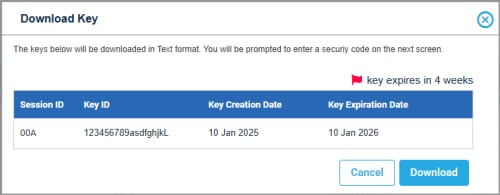
- Verify the code sent to the mobile device, then Submit.
The verification code is sent to the number associated with the CME Group Login of the user that created the Order Entry / iLink session.

The file is downloaded and an email notification is sent to the requestor.
- To secure the Drop Copy group with HMAC authentication:
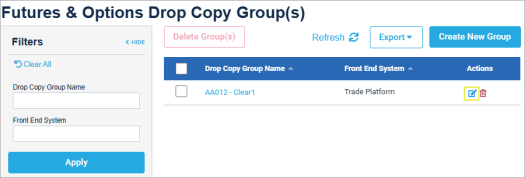
- From the Drop Copy Groups page, select Registered Entity, then select the edit (
 ) icon for the Drop Copy Group to secure.
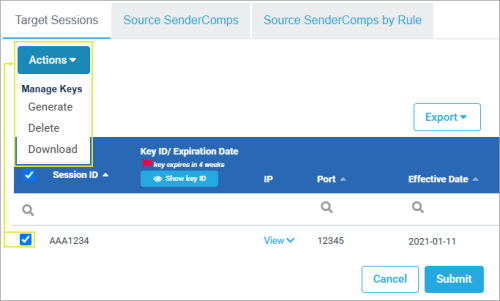
- Select the Target Session tab, then select the Session ID checkbox, then Manage Keys > Generate Keys.
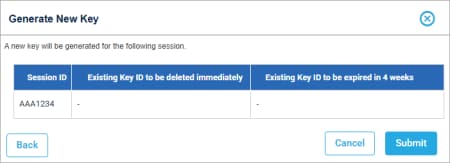
- On the dialog that appears, then Generate Key.
The dialog refreshes with the Key ID, Expiration, Download button.
- Select Download, confirm your identity by completing multi-factor identification, then Download the key to a file directory.
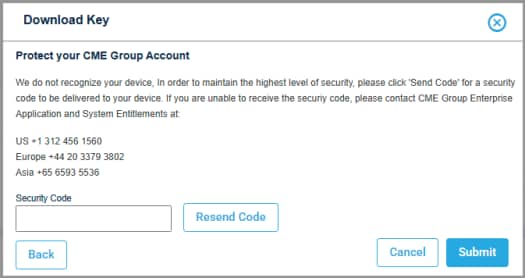
- SMS code: Sent to the default CME Group Login mobile phone.
- Contact EASE: Upon user identity verification, receive a one-time use code.
- Multi-factor authentication
- From the saved file, view the corresponding Secure Key, which is used for securing Drop Copy Sessions.
In addition, IP addresses used for connection are available from the Target Sessions tab (IP column).
Market Data Platform 3.0 (MDP 3.0) Hardware or Cloud Multicast
To connect to market data feeds, refer to the following Sandbox-Dallas resources.
To view details, use an active CME Group Login.
Establish Network Connectivity
Connect the virtual client network to the CME Group virtual network via NCC spokes.
- Create Virtual Private Clouds (VPCs) using the assigned CIDR range(s).
- Using the approved Project ID, request NCC spoke connections, establish a spoke connection by executing the following Google Cloud Command Line Interface (gcloud CLI) command:
bash
gcloud network-connectivity spokes linked-vpc-network create [SPOKE_NAME] \
--hub=projects/cme-dallas-sandbox-hub/locations/global/hubs/dallas-sandbox-hub \
--vpc-network=projects/[GOOGLE_PROJECT_ID]/global/networks/<YOUR_VPC_NAME> \
--region=us-central1
Note: When connecting client systems to the sandbox environment, ensure [GOOGLE_PROJECT_ID] and YOUR_VPC_NAME is updated with the VPC information (Spoke Name, Google Project ID) from the submitted details and/or confirmation email.
- Upon successful connection. The GCP console will indicate the spoke connection as "Established".
Connection Testing
Using telnet / netcat, perform a connectivity test against application endpoints:
Example: Ping test via telnet to verify successful iLink gateway connection.
Ensure client side firewall and identity access rules allow outbound traffic on the required ports (e.g. iLink order entry and Drop Copy) and permission to access the Google Cloud Console and environment.
The Google Cloud Console and email notification will confirm successful connection; status update from pending to active.
For information or connection assistance, contact ECHOGCP@cmegroup.com.


