User Help System
PII Data Submission
The following instructions illustrate the process used by an authorized PII Manager to access the PII Summary function to submit PII data.
Two methods are available:
- Manual (individual) submissions - Provide required identification information for a GUS/Trader.
- File (csv) upload - Upload up to 500 GUS/Trader users' PII information.
Contents
![]() View a video that introduces and demonstrates the PII process:
View a video that introduces and demonstrates the PII process:
- Impacted markets
- How to assign a short code to a Globex User Signature (GUS)
- How to add or delete PII information for GUS/Traders
View Summary / Submit Individual PII Information
The following instructions describe the process to access PII Summary to submit required information for an individual GUS / Trader.
- To submit PII information for an individual:
- From the CME Customer Center - Administration menu, select Request Center (ESS).

- From the Request Center menu, select PII > Summary.

This option is automatically selected for users with access to one entity.
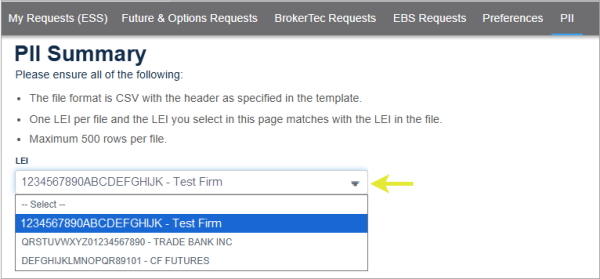
For the selected LEI, the PII Summary page lists Short Codes associated with GUS / Traders.
Available actions:
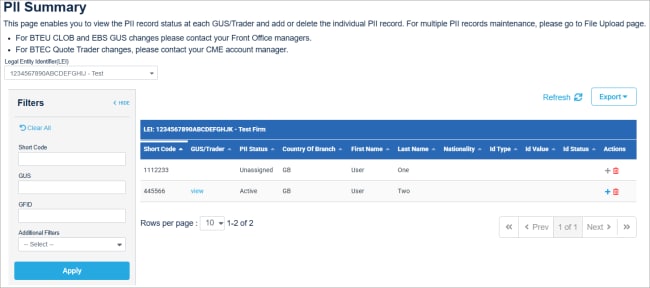
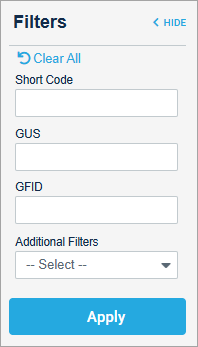
Note: If necessary, use the filters to search for a particular user: by short code, GUS, GFID or GUS with/without PII data or sort data by selecting column headings ( ).
).
- View GUS/Trader: To View GUS PII status and GUS information, select the blue hyperlinked GUS/Trader.
Review and validate GUS user information and short code before submitting the required ID set (see next).
Example: The first and last name on submitted IDs must exactly match the GUS/Trader's first and last name.
PII data records are linked to the Short Code, associated with the GUS / Trader for the selected Legal Entity Identifier (LEI).

Note: For a list of countries/country code and priority identifiers, refer to Section 3 - National client identifiers and priority levels of the CME Group PII Data Submission User Guide.
- Select the Country of the Branch from the drop-down menu.
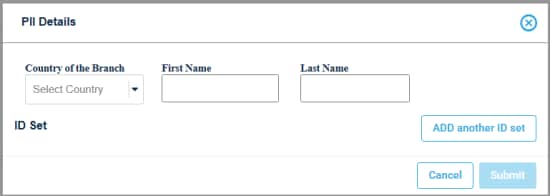
-First Name: Must exactly match the first name of the GUS user.
-Last Name: Must exactly match the last name of the GUS user.
- Select Add ID Set (+), then enter required identification details:
Note: To review a list of the acceptable ID Types for the selected country, refer to Section 3.1 - National client identifiers and priority levels.
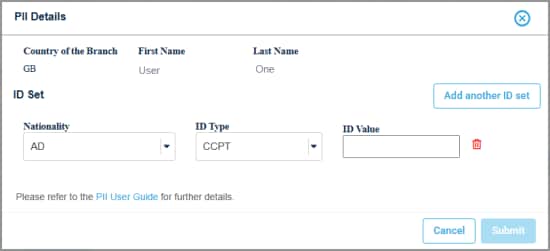
-Select the Nationality from the drop-down menu.
-ID Type: Based the selected Nationality, select from acceptable ID Types in the drop-down menu.
-ID Value: Enter the national ID value of the highest priority identifier.
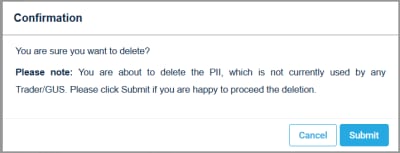
- Delete (
 ): Upon selecting, a confirmation dialog will appear.
Confirm deletion, by selecting Submit.
After deletion, trading MiFID products for the GUS will be disabled.
For regulatory obligations for deleted data, refer to section 4.6 Request the deletion of PII data. and section 5 Data handling and Participant's rights.
File Upload
The below instructions describe the process to select a LEI and upload a Comma Separated Value (CSV) file with PII and national ID information for up to 500 users. Using the file upload process the PII manager can add or delete records.
- To upload PII details:
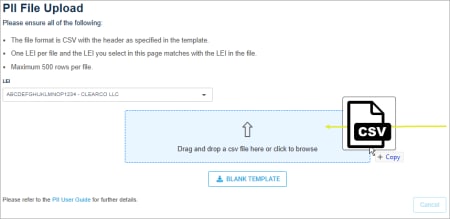
- From the Request Center (ESS) menu, select PII, then select File Upload.

This is automatically selected for users with access to one entity.
Using the file upload function, PII details can be added / deleted for one LEI at a time.
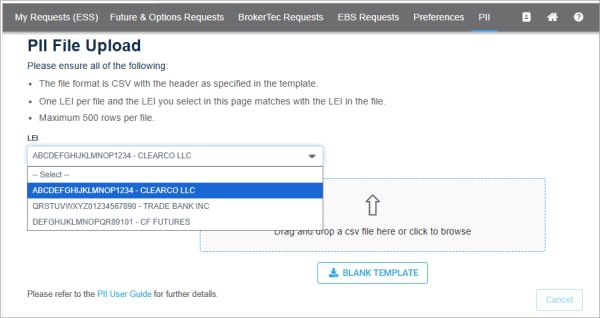
- Select a Blank Template then complete with required information or use a previously filled CSV file that matches the below referenced data requirements:
The following required data is entered on the csv file:
For guidance on preparing data for submission, refer to the CME Group PII Data Submission User Guide - section 3 - PII data required, which outlines fields, format and national client identifier (ID type and value).
- Do not delete the column heading values in row 1
- Participant’s LEI (only one LEI is allowed per file)
- Short code
- First Name (must match the First Name of the GUS, including capitalization)
- Last Name (must match the Last Name of the GUS, including capitalization)
- Country of Branch - ISO 3166-1 alpha-2 (two-letter code)
- Nationality - ISO 3166-1 alpha-2 (two-letter code)
- ID Type - in accordance with the allowed types and priority identifiers for the selected Nationality
- ID Value - corresponds to the ID Type
- ADD or DELETE
Only ADD or DELETE is permitted. To correct a record, Delete, then ADD the user information.
Deleting records will disable the GUS/Trader's ability to trade MiFID products.
For regulatory obligations for deleted data, refer to section 4.6 Request the deletion of PII data. and section 5 Data handling and Participant's rights.
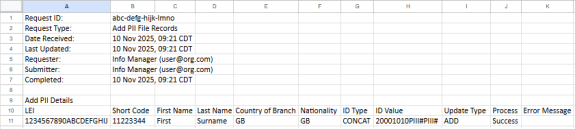
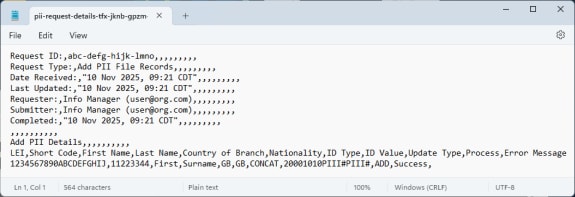
The following examples illustrate completed csv information; in worksheet and comma separated value file.
- CSV worksheet view:
- CSV file view:
- Drag and drop or browse to the pre-completed CSV file.
or 
The screen refreshes to show pending uploaded information.
- Review the Process status, resolve Error Messages if necessary, then select Submit.
For error messages and proposed resolutions, refer to the CME Group PII Data Submission User Guide - section 4.4 - Error messages.
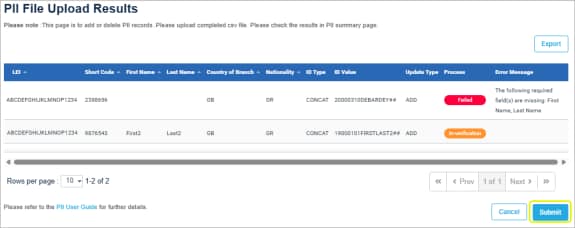
- In-verification: Uploaded details have passed initial data validation.
Selecting Submit will send for CME Group review.
- Failed: Submitted information has missing or incorrect data. Submission can continue with errors but the record(s) will not be included.
To resolve errors, cancel the upload, then update the CSV file.
After submission, go to My Requests to view final validation results.
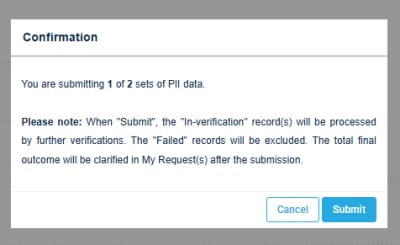
- On the confirmation message that appears, review the details, then select Submit.
In this example confirmation message, one submitted record passed initial data validation and will be submitted for review.
The failed record will be excluded from the submission.
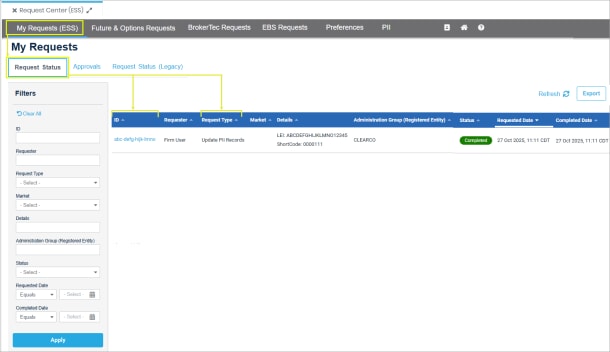
View Submitted Request Status
PII and file upload submissions are available from My Requests (ESS) - Request Status tab. Details including review progress is indicated in the Status column, which indicates successful or failed data validation:
- Completed: Request has been completed. To view details, select the ID.
- In-Progress: Data validation is not complete, refresh the page or view status later.
To find a particular request, use the Filter fields.
Example: Request Type = Update PII Records, Administration Group (Registered Entity) = firm/LEI
After clicking the ID, additional PII details are available, including the ability to export as a spreadsheet. The examples below illustrate Successful and Failed status.
- Success - PII data was submitted successfully; GUS/Trader and ID information correctly matches.
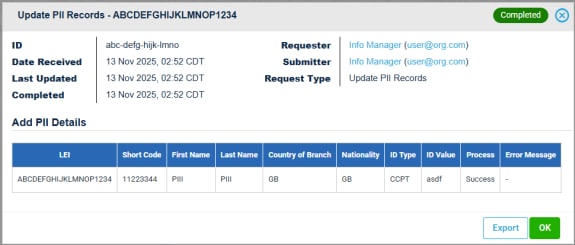
- Failed - The submitted information failed validation. Refer to the error messages for additional actions.


