User Help System
Dual-side Trade Entry
This procedure describes and example of how to enter a dual-side trade. See Single-Side Trade Entry for single-side trades, and Multi-Leg Transactions for multi-leg transactions.
See Swap Transactions for more information on this type of trade.
Use one of the following methods to enter trade information:
Enter Trade Information
Manually enter trade information on the Trade Entry page.
- To enter a trade:
- From the main ClearPort menu, click the Trade Entry tab.
- If User Preferences are being used, skip to Step 6.
- In the Trade Entry section, select an option from the Trade Type list.
- Enter a symbol or text in the Search for Product text box
OR
- Select a product group in the Product Groups drop-down list, and a product in the Products drop-down list.

The fields in the Product Information section are populated.
Note: To view all product information, click  next to the product name.
- In the Trade Information section, complete the following fields. Fields vary depending on the selected product:
- Report to CME Group SDR (Swap Transactions).
- Previously Reported to other SDR (Swap Transaction and Primary Economic Terms only selected for Report to CME Group SDR).
- Strategy Price (spreads only) enter a Strategy Price if no individual leg prices are being entered.
- In the Contract Terms section, complete the following fields, as applicable:
- Term (required) Enter or select a date.
- Strip/Pack/Bundle Indicates whether the trade uses a Strip, Pack, or Bundle strategy. If a selection is made here, the applicable fields in the Terms section will be enabled/disabled based on the selection made.
- End Term Use only if the trade is a Strip, Pack, or Bundle.
- Strike Price Enter if the trade is an Option. more information
- Put/Call Enter if the trade is an Option.
- Quantity (required)
Note:: Quantity accounts for the total quantity of strips, packs and bundles. For example, 10,000 units / month for a three month strip will total 30,000 units.
- Side (required)
- Price (required, except for TAS BLOCK, Pack or Bundle)
- Diff Price (required only for a TAS BLOCK, Pack, or Bundle)
Note: Click an area of the screen outside of the Price or Diff Price field to validate price.
Note: A message will appear if there is no settlement price to use for validation or if the price or price diff does not pass validation. The Price Validation check box must be selected to confirm the price.
- If applicable, select Inter-affiliated. (Swap Transactions)
- In the Allocation section, perform the following:

- For REMIT trades, specify whether the trade was Voice Brokered and the Aggressor (optional).
- Non-Swap transactions:
- Select a Designated party from the list.
- Specify the Order Number.
- Swap transactions:

- If appropriate, select Reporting Counterparty.
- Select a Block Trade Allocation Indicator from the list.
- Select a Designated party from the list, if necessary.
- Specify the Order Number.
- Complete the buyer / seller information. Do one of the following:
- Hover over frequent accounts and a list of the most frequently used accounts appears. Click an account to select that account.
OR
- Click in the Company Name field and select a Company Name, then specify the Trading Account and Name.
OR
- Click the search firm symbol (
 ), then type a portion of the firm name. A list of available firm names that include those letter(s) displays. Select a Company Name, then specify the Trading Account and Name.
Note: To switch to Single-side trade, click Single-side.

Note: Permitted Trading Accounts are based on Clearing Member assignment. To access and trade with additional accounts, contact the account owner or their Clearing Member.
.Note: Click  to switch Buyer / Seller information, as needed.
- To add additional buyers or sellers, click
 in the Buyer Information or Seller Information section, and add Buyer / Seller and Quantity information.
 - Enter Original Trade Date / Block Date.
- Enter Execution Time.

- Verify that the information is correct and that there are no messages indicating changes are needed.
- If correct, click the Submit button. The trade information is transfered to the Trade Entry screen, the trade is added to the Recently Entered Deals list, and a message displays indicating successful trade submission in the Trade Entry section of the screen.
- If not correct, click the Update button. The Dual Side Trade Entry screen appears for editing.
Note: Trades can only be updated if they are awaiting confirmation and submission from the Broker. Once they are submitted for clearing, they cannot be changed.
Note: Verify any leg prices calculated by CME ClearPort.
Copy from a Recently Entered Deal
- To copy a trade from a recently entered deal:
- Click a Trade ID in the Recently Entered Deals list.
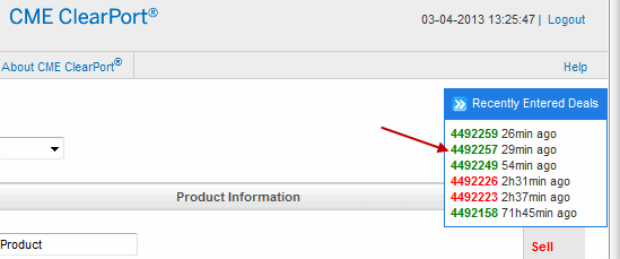
The trade displays in a new window.
- Click Copy.
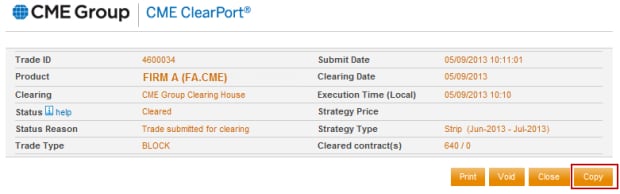
Trade information copies to the Trade Entry page and the window with new trade information closes.
- Enter Time.
- Modify trade information as necessary.
- If Price Validation message appears, click Price Validation box.


