User Help System
Adding Owners to the Main Account
The account owners and controllers must be added to the Main Account in order to ensure that the appropriate fees will be applied. To add an owner / controller to a Main Account, the User will need to do the following:
- To Add an Account Owner:
- From the section labeled Account Owners, select Add from the drop-down list above the Actions column.
Add an Account Owner

- After selecting Add, the search form will appear.
- When adding Owner(s) in Across Exchange Mode, the account owner list available for selection will contain only potential account owners that have member or incentive program status at all exchanges specified. If the account owner does not appear in the list, the User should review the owner’s status at each Exchange selected and revise the Exchange selections accordingly.
- Select the Account Owner by utilizing the Filter By feature.
- For Account Type Individual the User will have the following Filter By features to locate the account owner:
- Name: Select the Name radio button and type the first few characters of the individual’s last name in the textbox. The drop-down will automatically narrow the User’s search to the name that matches what was entered. Select the appropriate member from the list.
- Symbol: Select the Symbol radio button and type the first few characters of the individual’s member acronym in the textbox. The drop-down will automatically narrow the User’s search to the symbol that matches what was entered. Select the appropriate member from the list.
NOTE: When adding an Individual Member as account owner, that individual will also automatically be added as a controller.
- For Account Type Firm the User will have the following Filter By features to locate the account owner:
- ID: Select the ID radio button and type the firm ID in the textbox. The drop-down menu contains firm IDs and will automatically narrow the User’s search to the ID that was entered. If the ID does not appear in the drop-down list scroll through the list and select the ID of the appropriate firm.
- Name: Select the Name radio button and type the first few characters of the firm’s name in the textbox. The drop-down will automatically narrow the User’s search to the firm that was entered. Select the appropriate firm from the list.
Adding Account Owner: Filter By Firm
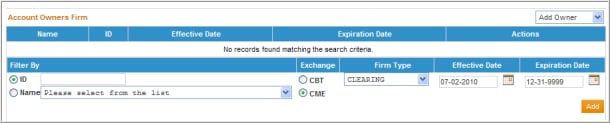
- Select an Exchange.
NOTE: this field exists only in the Single Exchange Mode and applies to CME and CBOT only, where members of one Exchange can also be registered as account owners for the other Exchange.
- Select the Firm Type (Member or Incentive Program category).
- Enter the Effective and Expiration Date of the Account Owner. Note that dates must be equal to or between the Main Account’s date range.
- Select the Add button. A confirmation message will appear above the Account Owner, stating that the account owner has been added. Note that only one owner is allowed unless the account type is specified as a joint account. If it is a joint account, then the User may continue to add as many owners to the account as needed.
Modifying Account Owners
When viewing an existing Main Account, the associated account owner(s) are displayed under the Account Owners section. Note: The User may use the Across Exchange Mode to edit account owner(s) at multiple Exchanges simultaneously, as long as the Main Account(s) exist at each selected Exchange.
The User can perform the following with respect to Account Owner:
- Delete Account Owner
- Update Account Owner(s) Effective and/or Expiration Dates
- View Membership will redirect the User to the Membership screen to view the account owner’s membership status.
- To Delete an Account Owner:
- Identify the appropriate row containing the account owner to be deleted. Select the Delete hyperlink in the Actions column for that row in order to the delete that account owner.
- A Message Box will display asking the User to confirm the deletion of the owner. Select OK to continue, or select Cancel.
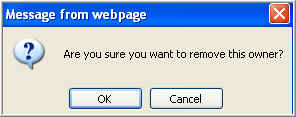
- If OK was selected then a confirmation message will display above the Account Details section confirming the account owner has been deleted.
Deleting Account Owner: Confirmation Message

NOTE: If you are deleting an individual member account owner, the system will also automatically delete the controller record for that member.
- To Update Account Owner(s) Effective and/or Expiration Dates

- Identify the appropriate row containing the account owner to be updated.
If the Effective Date or Expiration Date needs to be updated, the User may manually type over the date (MM-DD-YYYY) or select the calendar icon to select the effective date.
- Effective Date must be equal to or greater than the Main Account’s effective date.
- Expiration Date must be equal to or less than the Main Account‘s expiration date.
- Select the Update hyperlink in the Actions column for that row to apply the updates to the Owners’ Effective and/or Expiration Dates.
- A Message Box will display asking the User to confirm the updates. Select OK to continue, or select Cancel.
- If OK was selected then a confirmation message will display above the Account Details section confirming the account owner has been updated.
NOTE: If you are updating an individual member account owner, the system will automatically update the controller record for that member.
- To View Membership:
- Identify the appropriate row containing the account owner to view.
- Select the View Membership hyperlink in the Actions column for that row in order to the view that account owner’s membership information.
- The User will be redirected to the Membership Information screen.
- To return back to the Account Maintenance screen click on the Main Account ID line item within the Account Owners section.


