User Help System
Futures & Options Order Entry Sessions
Using the Futures & Options - Order Entry Sessions page, authorized users can create and manage order entry sessions which are used to:
- enter, modify and cancel orders
- receive confirmation messages (iLink 3)
Within a single Company (Primary / Secondary Globex firm), multiple order entry sessions can be created. Users can also generate and manage the secure key pairs that must be used for authentication during the secure logon process for order entry sessions.

A valid Futures & Options order entry session consists of:
- SenderCompID - required before running AutoCert+ certification tests.
- Session ID (characters 1-3)
- Globex Firm ID (characters 4-6)
- Fault Tolerance Indicator (character 7)
- Password
- Access Key ID
- IP address
- Port
- Market Segment ID (MSGW session)
The following functions are available on the Order Entry Sessions page
- Creating a Futures & Options Order Entry Session
- Viewing and Editing Futures & Options Order Entry Sessions
- Generating Keys for Futures & Options Order Entry Sessions
- Deleting Keys for Futures & Options Order Entry Sessions
- Downloading Keys for Futures & Options Order Entry Sessions
- Manage Session Protocols for Futures & Options Order Entry Sessions
Creating a Futures & Options Order Entry Session
On the Futures & Options - Order Entry Sessions page, users can create new Futures & Options order entry sessions.
Note: Globex Firm IDs must be created before requesting Futures & Options sessions.
- To create a new Futures & Options order entry session:
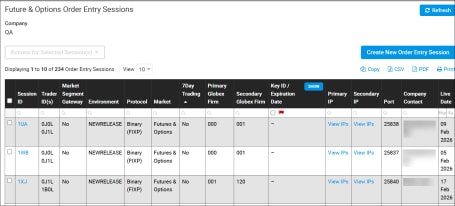
The Futures & Options order entry sessions for the company display.
- Enter the session details.
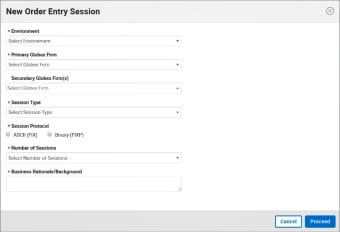
- Environment - CERT or NEWRELEASE
Note: Contact your Global Account Manager if you are unsure which environment to select.
- Primary Globex Firm
- Secondary Globex Firm(s) - Additional firm(s) authorized to trade on the session
- Session Type - Convenience Gateway or Market Segment Gateway
- 7Day Trading - Enables the Convenience Gateway for 24-7 trading. Check the Yes checkbox to enable 24-7; uncheck the checkbox to disable. This option is displayed for Convenience Gateway sessions only.
- Session Protocol - ASCII (FIX) or Binary (FIXP)
- Number of Sessions - 1 or 2
- Business Rationale / Background
- Click Proceed.
A notification displays at the top of the screen. An email notification is sent to the registered email address.

After requests are submitted, they will have a status of In-Progress until they are processed daily beginning at 4pm CT. Then they are processed and assigned a status of Completed or Failed. If a request fails, the reason for the failure will be included in the request details on the My Requests page.
After validation and setup, the status changes to Completed and the newly created session appears in the list on the Order Entry Sessions page, with an assigned Session ID.
Viewing and Editing Futures & Options Order Entry Sessions
From the Order Entry Sessions page, the following functions can be performed.
- View Futures & Options order entry session details
- Edit Futures & Options order entry session details
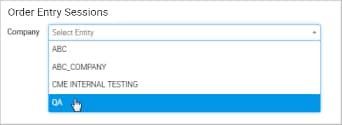
- Make a selection in the Company drop-down menu, if necessary.
The order entry sessions for the company display.

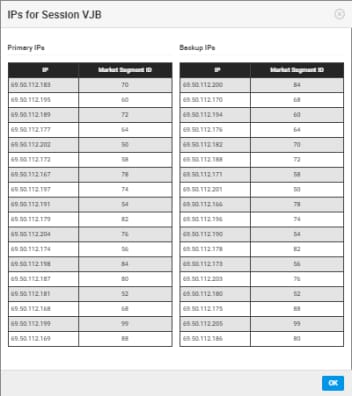
For Market Segment Gateway sessions, select View IPs in the Primary ID or Secondary IP field to view all of the primary and backup IPs.
- Select a Session ID.
The iLink session details display.
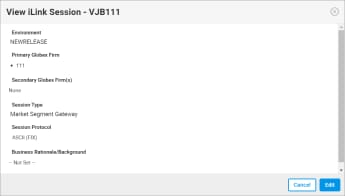
- View the session details.
- Click Edit.
Or
- Hover over one of the fields (Primary Globex Firm, Secondary Globex Firm(s), Session Protocol, Business Rationale/Background) and select the edit icon (
 ).
).
- Update as necessary.
![]()
- Click Submit.
- A notification displays. An email notification is sent to the registered email address.

Generating Keys for Futures & Options Order Entry Sessions
See: "Secure Key Pairs"
- To generate keys for Futures & Options order entry sessions
- Select a session ID(s).
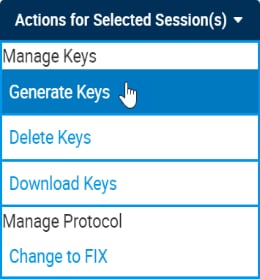
- Select Actions for Selected Session(s).
- Select Generate Keys.
- If prompted, select a key(s) to be deleted immediately and select Delete Selected Key(s) and Proceed.
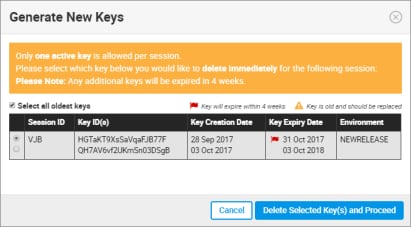
- The Generate New Keys window displays any existing key IDs.

- Existing Key ID to be expired in 4 weeks
- Existing Key ID to be deleted Immediately - this key id (selected in the previous step) will be deleted immediately upon creation of a new key id.
Click Generate Key(s).
- A notification at the top of the screen and the Download Keys window are displayed. An email notification is sent to the registered email address.
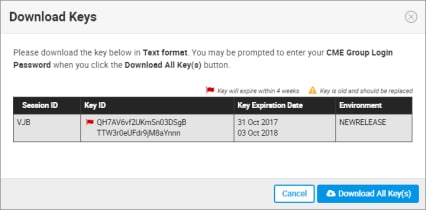
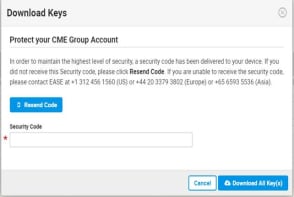
- Click Download All Key(s).
- Enter the security code that was sent to your device.
If you did not receive the security code, select Resend Code.

- Click Download All Key(s).
- Select a destination for the file if your web browser requires.
- Open the saved file to view the secure key pair(s).
Deleting Keys for Futures & Options Order Entry Sessions
See: "Secure Key Pairs"
- To delete keys for Futures & Options order entry sessions
- Select a session ID(s).
- Select Actions for Selected Session(s).
- Click Delete Keys.
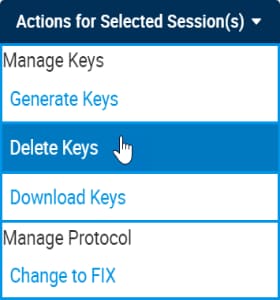
If there is more than one key for a session, select the key(s) to be deleted.
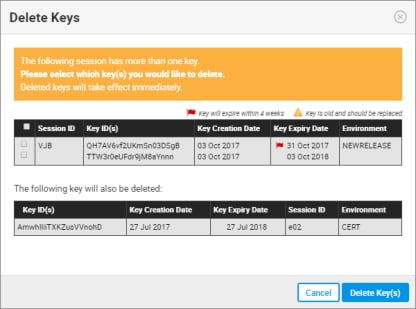
- Click Delete Key(s).
- In the confirmation window, select Delete Key(s) again.
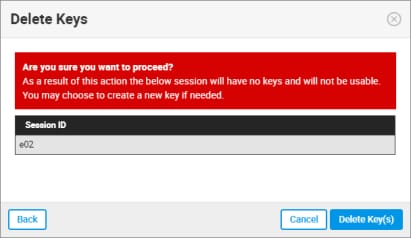
- A notification displays at the top of the screen. An email notification is sent to the registered email address.

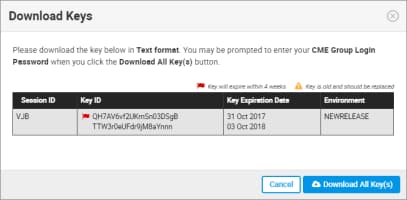
Downloading Keys for Futures & Options Order Entry Sessions
See: "Secure Key Pairs"
- To download existing keys in text format for Futures & Options order entry sessions
- Select a session ID(s).
- Select Actions for Selected Session(s).
- Click Download Keys
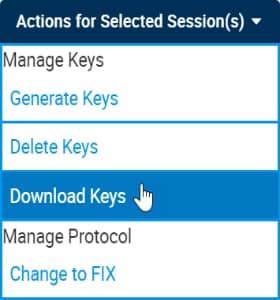
- Click Download All Keys.
- Enter the security code that was sent to your device.
If you did not receive the security code, select Resend Code.
- Click Download All Key(s).
- Select a destination for the file if your web browser requires.
- Open the saved file to view the secure key pair(s).
Manage Session Protocols for Futures & Options Order Entry Sessions
Users can change the protocol for certain sessions (FIX or FIXP).
Note: Session protocols can only be changed for Futures & Options Order Entry MSGW (Market Segment Gateway) sessions. Session protocol management is not available for Futures & Options Convenience Gateway (CGW) sessions because only FIX is available for CGW sessions.
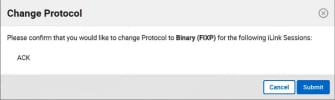
- To change session protocols for Futures & Options order entry sessions
- Select a session ID(s).
- Select Actions for Selected Session(s).

- Select Change to FIX or Change to FIXP.
- Select Submit.
A notification displays.

After requests are submitted, they will have a status of In-Progress until they are processed daily beginning at 4pm CT. Then they are processed and assigned a status of Completed or Failed. If a request fails, the reason for the failure will be included in the request details on the My Requests page.
After validation and setup, the status changes to Completed and the updated protocol appears in the list on the Order Entry Sessions page, with an assigned Session ID.


