Self Match Prevention Instruction Support
The purpose of this test is to verify the client system can correctly support self match prevention functionality.
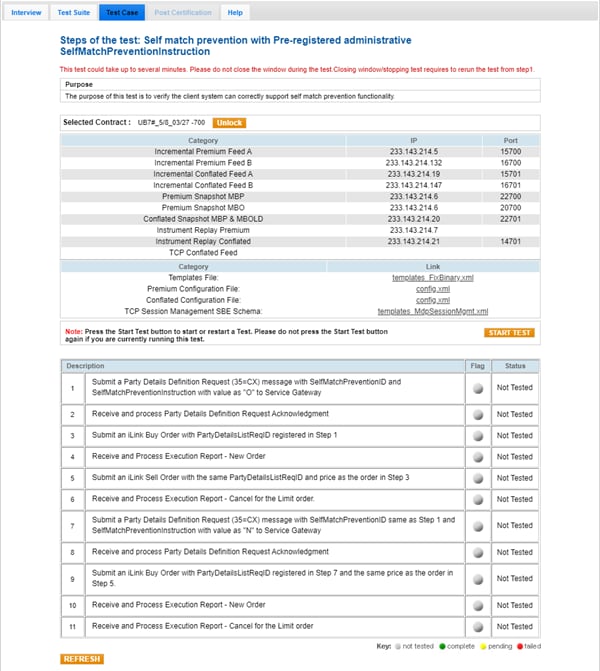
Pre-Registered Format
Note: If a test is not proceeding to the next step, selecting the Refresh button ( ) below the test steps may resolve the issue.
- To run a Self Match Prevention Instruction Support Pre-Registered Format test:
- Select a SenderComp from the drop-down and select ASSIGN if a SenderComp is not already assigned.
- From the Contracts drop-down, select the desired contract if the contract is not already locked.
- Select the START TEST button.
Note: DO NOT select the START TEST button once the test is in progress.
- Submit a Party Details Definition Request (35=CX) message with SelfMatchPreventionID and SelfMatchPreventionInstruction with value as "O" to Service Gateway.
- Select Yes or No to indicate whether your system received and processed the Party Details Definition Request Acknowledgment..
- Submit an iLink Buy Order with PartyDetailsListReqID registered in Step 1.
- Select Yes or No to indicate whether your system received and processed the Execution Report - New Order.
- Submit an iLink Sell Order with the same PartyDetailsListReqID and price as the order in step 3.
- Enter the value from tag 378-ExecRestatementReason to confirm that your system received and processed the Execution Report - Cancel for the Limit order.
- Submit a Party Details Definition Request (35=CX) message with SelfMatchPreventionID the same as Step 1 and SelfMatchPreventionInstruction with value as "N" to Service Gateway.
- Select Yes or No to indicate whether your system received and processed the Party Details Definition Request Acknowledgment.
- Submit an iLink Buy Order with PartyDetailsListReqID registered in Step 7 and the same price as the order in Step 5.
- Select Yes or No to indicate whether your system received and processed the Execution Report - New Order.
- Enter the value from tag 378-ExecRestatementReason to confirm that your system received and processed the Execution Report - Cancel for the Limit order.
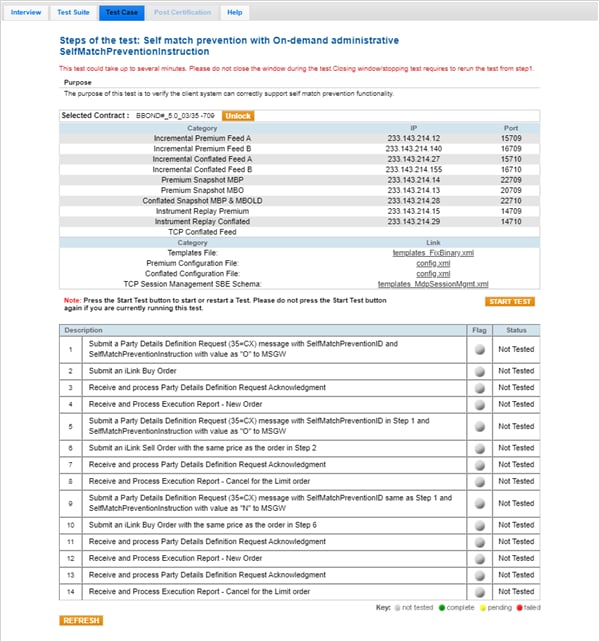
On-Demand Format
Note: If a test is not proceeding to the next step, selecting the Refresh button ( ) below the test steps may resolve the issue.
- To run a Self Match Prevention Instruction Support Pre-Registered Format test:
- Select a SenderComp from the drop-down and select ASSIGN if a SenderComp is not already assigned.
- From the Contracts drop-down, select the desired contract if the contract is not already locked.
- Select the START TEST button.
Note: DO NOT select the START TEST button once the test is in progress.
- Submit a Party Details Definition Request (35=CX) message with SelfMatchPreventionID and SelfMatchPreventionInstruction with the value as "O" to the MSGW.
- Submit an iLink Buy Order.
- Select Yes or No to indicate whether your system received and processed the Party Details Definition Request Acknowledgment.
- Select Yes or No to indicate whether your system received and processed the Execution Report - New Order.
- Submit a Party Details Definition Request (35=CX) message with SelfMatchPreventionID from step 1 and SelfMatchPreventionInstruction with the value as "O" to the MSGW.
- Submit an iLink Sell Order with the same price as the order in step 2.
- Select Yes or No to indicate whether your system received and processed the Party Details Definition Request Acknowledgment.
- Enter the value from tag 378-ExecRestatementReason to confirm that your system received and processed the Execution Report - Cancel for the Limit order.
- Submit a Party Details Definition Request (35=CX) message with SelfMatchPreventionID the same value as step 1 and SelfMatchPreventionInstruction with a value as "N" to the MSGW.
- Submit an iLink Buy Order with the same price as the order in step 6.
- Select Yes or No to indicate whether your system received and processed the Party Details Definition Request Acknowledgment.
- Select Yes or No to indicate whether your system received and processed the Execution Report - New Order.
- Select Yes or No to indicate whether your system received and processed the Party Details Definition Request Acknowledgment.
- Enter the value from tag 378-ExecRestatementReason to confirm that your system received and processed the Execution Report - Cancel for the Limit order.